
Key takeaways
- Knee-to-Knee Support: The fabric or hip seat should extend from one of your baby’s knees to the other, supporting the entire thigh.
- Bottom Below Knees: When looking at your baby from the side, their bottom should appear lower than their knees, creating a natural curve.
- Thighs Spread: The carrier should encourage a natural outward rotation of your baby’s hips, with their legs forming an “M” shape.
As experienced babywearers, we know that a proper, deep hip seat in a baby carrier is crucial for both comfort and infant development. It ensures your baby’s hips are in a healthy, ergonomic position, often referred to as the “M” or “frog-leg” position. This positioning supports proper hip joint development and can prevent issues like hip dysplasia. But what exactly constitutes a “deep” hip seat, and how do you achieve it with your chosen carrier? This guide will walk you through it.
Achieving that perfect, supportive seat isn’t just about the carrier itself; it’s about understanding how to adjust and position it correctly for your baby’s unique anatomy. We’ll cover everything from identifying the right carrier features to mastering the adjustment techniques. Let’s dive in!
Our top picks






As an Amazon Associate we earn from qualifying purchases at no extra cost to you.
⚡ Save on Your Next PC — Amazon Prime
Prime members get fast free shipping on the systems above, plus early access to Prime Day & Black Friday PC deals. New members get a 30-day free trial.
Watch: How to Achieve a Deep Hip Seat in a Baby Carrier — Video Review
Understanding the “Deep Seat” Concept
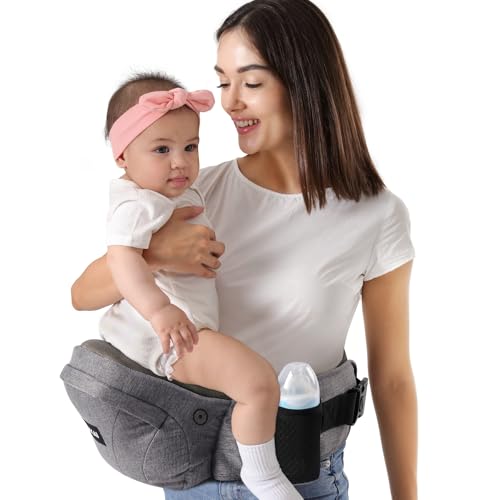
The “deep seat” refers to the width and depth of the carrier’s base that supports your baby’s bottom and thighs. For a healthy hip position, the carrier should support your baby from knee to knee, with their thighs naturally spread and their bottom lower than their knees. This mimics the natural squatting position that is ideal for hip development. A shallow seat, on the other hand, can put pressure on the soft tissues of the groin and hips, forcing the legs into an unnatural, dangling position.
- Knee-to-Knee Support: The fabric or hip seat should extend from one of your baby’s knees to the other, supporting the entire thigh.
- Bottom Below Knees: When looking at your baby from the side, their bottom should appear lower than their knees, creating a natural curve.
- Thighs Spread: The carrier should encourage a natural outward rotation of your baby’s hips, with their legs forming an “M” shape.
Key Features of Hip Seat Carriers for a Deep Seat
Not all hip seat carriers are created equal when it comes to achieving a deep, ergonomic seat. Here are the features to look for:
- Adjustable Seat Width: The best carriers offer adjustable seat widths, allowing you to customize the support based on your baby’s size and age. This is essential as your baby grows. Look for carriers that can adjust from a narrower setting for newborns to a wider setting for toddlers. Some carriers, like the HKAI Baby Hip Carrier, feature a wide, adjustable waistband and a non-slip hip seat surface designed for this purpose.
- Generous Hip Seat Padding (Where Applicable): While some carriers are minimalist, a well-designed hip seat carrier provides ample, firm padding that creates a stable platform for your baby. The Tushbaby The Original Premium Quality Hip Seat Carrier is known for its substantial hip seat that offers excellent support.
- Integrated Seat vs. Attached Seat: Some carriers have a built-in seat that is part of the carrier’s structure, while others offer an attachable or foldable hip seat. For a consistently deep seat, an integrated or a well-designed, sturdy attachable seat is preferable. The Beco Foldable Hip Seat Baby Carrier offers versatility while aiming for ergonomic positioning.
- No-Foam Designs: While foam can add initial cushioning, it can sometimes compress over time, leading to a less supportive seat. Carriers with a firm, molded seat or a well-constructed fabric seat, like the Tushbaby Original Hip Seat Baby Carrier (Grey), often maintain their supportive shape longer.
Adjusting Your Hip Seat Carrier for the Perfect Fit
Once you have a carrier with the right features, proper adjustment is key. This process is similar whether you’re using a dedicated hip seat carrier or a carrier with an integrated hip seat.
- Position the Hip Seat: For a hip seat carrier, the hip seat should rest comfortably on your hip bone, or slightly above it, on the side you intend to carry your baby. The goal is to create a sturdy platform that supports your baby’s weight.
- Place Your Baby: Bring your baby onto the hip seat, ensuring their bottom is nestled securely on the padded surface.
- Bring Legs Up and Out: Gently pull your baby’s knees up towards their belly button, then let their legs spread naturally outwards. Ensure their knees are higher than their bottom.
- Secure the Baby: For carriers with a fabric panel or waist belt that wraps around your baby, ensure it’s snug from knee to knee. The waist belt should be comfortably tight around your waist, just below the hip seat, to provide stability. The Grownsy Safety-Certified Baby Hip Seat Carrier is designed with safety buckles and adjustable straps to help achieve this secure fit.
- Check for the “M” Shape: Continuously check that your baby’s legs are in the “M” position with their knees higher than their hips. Adjust the fabric or seat width as needed.
Ensuring Safety and Comfort
A deep hip seat is paramount for safety and comfort, not just for your baby but for you too. When your baby is properly supported, their weight is distributed more evenly, reducing strain on your back and shoulders. A carrier like the Dreambaby Baby Hip Seat Carrier is lightweight and designed for ease of use, contributing to overall comfort during extended wear.
- Weight Distribution: A deep seat means your baby’s weight is carried on the hip and your supporting arm, rather than dangling from the crotch.
- Spine Alignment: The ergonomic position promotes a natural “C” curve in your baby’s spine.
- Pressure Relief: Proper positioning prevents pressure on your baby’s developing hips and groin.
- Parental Comfort: When your baby is well-supported, you’re less likely to experience back pain or discomfort.
Tips for Achieving and Maintaining a Deep Seat
- Read your carrier’s instruction manual thoroughly.
- Practice adjusting the carrier without your baby first.
- Ensure the hip seat is level or slightly angled upwards towards your body.
- Periodically check the fit as your baby grows and gains weight.
- Don’t be afraid to try different carriers if one isn’t working for your baby’s body shape.
Frequently Asked Questions
What is the ideal age for a hip seat carrier?
Hip seat carriers are generally suitable for babies from around 4-6 months old when they have good head and neck control, up to toddlerhood (often up to 45 lbs, depending on the carrier). Some carriers offer newborn inserts for earlier use, but always ensure your baby can be positioned ergonomically.
How do I know if my baby’s hips are in the correct position?
Look for the “M” shape: their bottom should be lower than their knees, and their thighs should be spread apart at a 45-60 degree angle. Their knees should be bent and higher than their bottom.
Can a hip seat carrier cause hip problems?
Only if used incorrectly. A shallow seat or improper positioning can put stress on the hips. Always ensure the carrier provides a deep, knee-to-knee, ergonomic seat.
How often should I check the fit of my carrier?
It’s a good practice to check the fit every time you put your baby in the carrier, especially as they grow. Adjustments might be needed frequently.
Conclusion
Achieving a deep hip seat in a baby carrier is a foundational element of safe and comfortable babywearing. By understanding the key features to look for, mastering adjustment techniques, and prioritizing your baby’s ergonomic positioning, you can ensure a healthy and enjoyable experience for both of you. Remember, a well-fitted carrier supports your baby’s development and your own well-being, making every carry a bonding opportunity.



![Review: [Specific Brand] Baby Carrier for Breastfeeding (2026)](https://babywearingdoula.com/wp-content/uploads/2026/08/review-specific-brand-baby-carrier-for-breastfeeding-312x250.jpg)



![Review: [Specific Brand] Hybrid Wrap Carrier (2026)](https://babywearingdoula.com/wp-content/uploads/2026/08/review-specific-brand-hybrid-wrap-carrier-320x250.jpg)